For some February means overheated apartments and clanky radiators, but for homeowners it’s more often a struggle to keep an inefficient home cheaply warmed. Since most of us do not have the nearly perfectly sealed thermal envelope like the one shown above from a thermal image of a passive house, there is almost always room for improvement. What many don’t realize is addressing energy loss by decreasing cold air infiltration are often relatively simple fixes with associated costs far lower than continuing to jack up the heat. Improving a home’s overall thermal envelope doesn’t always require renovation, and small changes have far-reaching implications. Here is a look at five problem areas that cause heat loss in colder climates and older homes with some potential solutions to explore.
Inefficient Windows
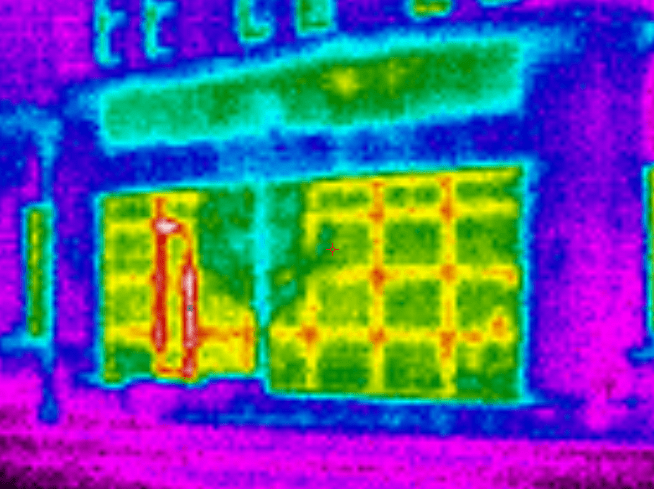
The Energy Information Administration estimates that up to one-third of the typical home’s heat loss is from windows and doors. Especially in homes and apartments with metal-framed windows and large panes without glazing. The example provided here shows the intensity of heat loss in a building with large metal-framed windows. The outdoor temperature is below freezing, but the thermograph shows a reading of nearly 71 degrees Fahrenheit at the center (shown here with a red dot), indicating excessive heat is radiating from the building’s interior.
Thankfully, there is no shortage of options to reduce heat transfer between indoors and outdoors without replacing windows entirely. A quick fix is to create a thermal barrier between exterior and interior conditions by adding blinds or draperies. The trade-off of this method is that adding such barriers also limits the capacity to maximize natural light during the day. For windows oriented so that direct solar gain during the early afternoon won’t cause indoor cooling, blinds or draperies should be opened to let in light for those hours each day.
Window caulking and sealing is another DIY option to fill in the cracks in framing that cause some of this heat loss. Caulking is a relatively simple process, and if there is concern about it being a too permanent solution, there are short-term sealants available that should be peeled off in spring or summer.
Finally, applying protective films such as a low-e (low emissivity) coating are a bit more expensive, but will most likely pay for themselves in savings in under a year. Low-E coatings reduce the U-factor (the rate at which glazing conducts non-solar heat flow). If replacing windows entirely seems like the best option in order to improve the building’s overall envelope, Low-E coated windows cost an estimated 10 to 15% more, but reduce energy loss by up to 50%.
Poor Attic Ventilation
Since it’s usually intentional to keep attics colder in winter to prevent ice damming from melted snow collection in gutters, the impact of an improperly ventilated attic is often overlooked. An important part of natural cooling in attic space is preventing heat transfer from lower stories. In order to appropriately cover an attic floor in insulation, adding insulation baffles (also referred to as rafter vents) to the attic is needed to ensure consistent airflow from outdoors without any infiltration between the attic and the rest of the home. A guide to DIY attic ventilation is available from ENERGY STAR.
Chimney Heat Loss
While a fireplace is a source of heat, an open chimney can amount to up to 70% of heat loss in a room. For drafty chimneys, it’s critical to put in a chimney balloon—which is exactly what it sounds like, a balloon that floats in the chimney filling up space causing air leaks—in place in order to block air flow. For those with this problem who really want a free, and DIY option, EcoThrifty Living has a guide to making your own chimney balloon.
Ineffective Insulation
While most insulation has a life expectancy beyond our own, some choices are far more efficient and easier to maintain than others. Certain insulations, like loose-fill fiberglass, are cheaper to install but have a lower R-Value (the ability for insulation to resist heat flow). Furthermore, cheaper fiberglass insulation is subject to moisture damage, which will limit insulation capabilities overtime.
Replacing insulation is one of the more costly energy improvements, so consider bringing in an energy auditor or using a thermo-imaging device to learn more problem areas along the building exterior. Most states have programs where much of the population qualifies for a free or relatively cheap energy audit. Alternatively, homeowners can seek the help of start-ups, like one of out MIT, that is able to perform drive-by heat mapping using a vehicle similar to Google’s street-imaging cars. For a simple way to test insulation performance, use an infrared thermometer (which can cost as low as $15 to $50) to calculate the temperature difference between the exterior and interior of a wall and comparing it to the current indoor and outdoor temperatures.
Thermal Bridging
Thermal bridging, the process by which a more conductive material enables heat flow through walls and insulation, is a much larger cause of energy loss than often anticipated. Thermal bridges via studs and framing lower the overall R-Value of a wall and aid loss of heat to the outdoors in winter. The image below shows a potential bridge across one section of wall from an apartment building’s exterior siding, raising the along one area about four to five degrees.
Thermal bridging is most directly addressed through the addition of a thermal break by adding foam or other low-conductivity materials to the external layer of wall sheathing or adding a layer of insulation directly around studs. Most of the solutions to this issue are not DIY fixes (though to combat thermal bridging in summer shading over metal windows and doors will at least limit some of the problem). If a particular source of thermal bridging occurs in a lesser used room of the house, keeping doors closed and adding draught excluders to the bottom of doors and windows will at least isolate the problem. Some occasions are worth exploring in the case of an energy audit or weatherization, to get a whole picture of a building image, like this building façade below to really determine where the leaks are.
For more information about energy audits, visit this guide from the Department of Energy.